Stampare da iPad/iPhone su Gnu/Linux con AirPrint

Ok,

visto che nel nuovo IOS 4.2 si può stampare via AirPrint, perché non sfruttare la condivisione delle stampanti di CUPS per stampare da iPhone/iPad su una periferica gestita da GNU/Linux?

Lo spunto, con qualche aggiunta personalizzata, lo ha dato questo articolo in cui l’autore ha spippolato con Wireshark per esaminare il dialogo in rete di AirPrint, per scoprire che il tutto viaggia su protocollo IPP modificato.

IPP???? Mmmmm….quindi…CUPS! E Avahi, naturalmente, per annunciare in rete il servizio di stampa.

Quindi…

1. Installare CUPS, configurare la stampante connessa al computer, collegarsi su localhost:631  e da tab di amministrazione condividere la stampante, come si vede nella immagine sottostante.

Quindi verificare che la stampante…stampi correttamente da computer.

Ora, installate avahi-daemon e quindi scaricate lo script python che trovate qui e che ho caricato in copia qui e lanciatelo da console:

root@SALOTTO:/home/zarrelli/Scaricati/tjfontaine-airprint-generate-af37647# python airprint-generate.py -v
BRFAX Losing support for: text/css,image/x-photocd,image/x-bitmap,application/vnd.hp-hpgl,application/vnd.cups-raw
Created: AirPrint-BRFAX.service
Hewlett-Packard-HP-LaserJet-6P Losing support for: text/css,image/x-photocd,image/x-bitmap,application/vnd.hp-hpgl,application/vnd.cups-raw,application/vnd.cups-postscript
Created: AirPrint-Hewlett-Packard-HP-LaserJet-6P.service
Brother-MFC-210C Losing support for: text/css,image/x-photocd,image/x-bitmap,application/vnd.hp-hpgl,application/vnd.cups-raw
Created: AirPrint-Brother-MFC-210C.service
root@SALOTTO:/home/zarrelli/Scaricati/tjfontaine-airprint-generate-af37647#
root@SALOTTO:/home/zarrelli/Scaricati/tjfontaine-airprint-generate-af37647# python airprint-generate.py -vBRFAX Losing support for: text/css,image/x-photocd,image/x-bitmap,application/vnd.hp-hpgl,application/vnd.cups-rawCreated: AirPrint-BRFAX.serviceHewlett-Packard-HP-LaserJet-6P Losing support for: text/css,image/x-photocd,image/x-bitmap,application/vnd.hp-hpgl,application/vnd.cups-raw,application/vnd.cups-postscriptCreated: AirPrint-Hewlett-Packard-HP-LaserJet-6P.serviceBrother-MFC-210C Losing support for: text/css,image/x-photocd,image/x-bitmap,application/vnd.hp-hpgl,application/vnd.cups-rawCreated: AirPrint-Brother-MFC-210C.serviceroot@SALOTTO:/home/zarrelli/Scaricati/tjfontaine-airprint-generate-af37647#

In pratica, vi genererà un file XML per ogni stampante condivisa da CUPS, contenente le informazioni necessarie alla pubblicazione tramite Avahi con le modifiche necessarie a renderla “digeribile da AirPrint.

Copiate in

/etc/avahi/services/

il file relativo alla stampante che volete utilizzare tramite AirPlay, nel mio caso

AirPrint-Brother-MFC-210C.service

Ora, aprite il file

/etc/cups/cupsd.conf

e assicuratevi che ci siano le seguenti informazioni:

ServerAlias *
Port 631
Listen /var/run/cups/cups.sock

Tanto per non sbagliare, riavviamo i servizi cups  e avahi-daemon:

service cupsd restart
service avahi-daemon restart

Fatto. Finito. Ora aprite Safari, pigiate sull’icona delle azioni (quella centrale in basso),  scegliete “Stampa” e buon divertimento con la vostra nuova, vecchia stampante AirPrint.

P.S.

Chiedo venia per lo stile un po’ raffazzonato, ma è tardi…

Giochiamo con Label e UUID

Mettiamo il caso che si stia lavorando su un server, un lavoro delicato, eh, e che la fuckup fairy decida proprio in quel momento di venire a trovarvi…

Mettiamo il caso che per una botta incredibile di fortuna, vi interrompano mentre state eseguendo un echo su /etc/fstab e invece di un bel >> vi ritroviate con >.

Ok, in questo caso fate ciao ciao con la manina a /etc/fstab e pensate intensamente al fatto che, genialmente, chi si occupa dei backup se n’è andato in vacanza una settimana prima di voi.

Ora, proprio per non rendere le cose facili, tenete conto che il vostro /etc/fstab monti i filesystem indicandoli con una volume label che, ovviamente, ora non ricordate, del tipo :

LABEL=SW-cciss/c0d0p2   swap                    swap    defaults        0 0

Questo è un caso classico, una swap referenziata da label, e cancellata la riga chi si ricorda più dove, come, quando, perché? Volendo ripristinare un mount via label, una via semplice per recuperare l’etichetta mancante consiste nell’utilizzare bklid:

#: blkid /dev/cciss/c0d0p2
/dev/cciss/c0d0p2: TYPE="swap" LABEL="SW-cciss/c0d0p2" UUID="1b2e35d0-8321-4d5b-bed0-647b862cbc88"

Fatto. La label è

SW-cciss/c0d0p2

Incidentalmente, ma nemmeno troppo, blkid vi mostra anche la UUID del filesystem. Infatti, potreste volere montare il filesystem usando il suo UUID e quindi la precedente istruzione in /etc/fstab potrebbe essere riscritta come:

UUID=1b2e35d0-8321-4d5b-bed0-647b862cbc88 swap swap defaults 0 0

Ciò vale per qualsiasi filesystem. Per esempio, questa regola di mount per il filesystem contenente i database di MySQL, da così

/dev/VolGroup00/LogVol03 /var/lib/mysql ext3 defaults 1 2

passando per

#: blkid /dev/VolGroup00/LogVol03
/dev/VolGroup00/LogVol03: UUID="fb5050a9-6641-4ec8-a1dc-5365b326d9bd" TYPE="ext3"

Può essere riscritta come:

UUID=fb5050a9-6641-4ec8-a1dc-5365b326d9bd /var/lib/mysql ext3 defaults 1 2

Avete notato nulla? Il filesystem è sprovvisto di una volume label. Rimediamo applicando una etichetta che ci consenta di capire al volo la funzione del filesystem montato:

tune2fs -L "MySQL DB" /dev/VolGroup00/LogVol03

Controlliamo che il filesystem abbia preso l’etichetta in maniera corretta:


#: blkid /dev/VolGroup00/LogVol03
/dev/VolGroup00/LogVol03: UUID="fb5050a9-6641-4ec8-a1dc-5365b326d9bd" TYPE="ext3" LABEL="MySQL DB"

Ora non rimane che modificare /etc/fstab per rimontare il filesystem usando la nuova label:

LABEL=MySQL\040DB /var/lib/mysql ext3 defaults 1 2

Notato qualcosa? Forse quello

\040

messo fra MySQL e DB? Esatto. Serve per eseguire l’escape dello spazio fra le due parole che compongono la label. Se date un’occhiata al man 5 di fstab noterete che gli spazi vanno sottoposti a escape se si trovano all’interno di una etichetta o nel percorso del mount point. Quindi, corollario molto semplice, potete anche creare dei mount point il cui percorso sia composto da più termni separati da uno spazio.

Proviamoci:

mkdir "/Spazio per i file database di MySQL"

Quindi modifichiamo in questo modo /etc/fstab:

LABEL=MySQL\040DB /Spazio\040per\040i\040file\040database\040di\040MySQL ext3 defaults 1 2

Ora non rimane che smontare e rimontare il filesystem:

umount /var/lib/mysql/ ; mount -a

e infine, verifichiamo la buona riuscita dell’operazione:

#: mount | grep Spazio
/dev/mapper/VolGroup00-LogVol03 on /Spazio per i file database di MySQL type ext3 (rw)

e poi:

ls /Spazio\ per\ i\ file\ database\ di\ MySQL/
controllo ib_logfile0 ib_logfile1 ibdata1 lost+found mysql nagios_data

Bene, direi che tutto è a posto. Non vi rimane che fare qualche esperimento, giusto?

P.S.

Nel caso aveste giocato con la directory dei db di MySQL (ma siete pazzi come me?), rimettete tutto a posto, oppure modificate il puntamento in my.cnf.

Corso su Nagios – Brainstorming Phase

Dato che il mio amichino Theo mi suggeriva che forse a qualcuno potrebbe interessare un tutorial su come installare e configurare Nagios, stavo pensando di iniziare un corso su Nagios articolato, per ora, nei seguenti step:

1. Avvicinamento. Cosa è Nagios, a cosa mi può servire, cosa fa;

2. Hands on. Prendiamo i sorgenti di Nagios, compiliamoli e installiamolo su un server. Partirò da una virtual machine Ubuntu Desktop pulita, indicandovi quali pacchetti o programmi o librerie accessorie installare e come farlo. Parto da una Destkop, tanto per non farvi ammattire;

3. Test the difference. Seconda macchina virtuale. Questa sarà il client Ubuntu che terremo sotto controllo, su questa installeremo gli agenti e impareremo a configurarne il supporto SNMP;

4. Win on Win. Impareremo a installare, configurare e interrogare il clent Nsclient++, in modo da tenere sotto controllo anche le macchine Windows. Davvero pensavate che avrei ignorato Windows?

4. So confusing, so amazing. Giusto un po’ di teoria. I file principali di Nagios, la loro sintassi, il significato delle varie istruzioni. Questo punto richiederà probabilmente una serie di puntate a parte;

5. Creiamo il nostro primo plugin. Si, si, giusto un paio di api, un po’ di bash, e si fa tutto. Imparerete a estendere Nagios oltre ogni vostra immaginazione. Ok, frase ad effetto ma rende l’idea.

6. Agentless! SNMP mon amour. Ok, vedremo come configurare Net-Snmp, come interrogarlo in maniera sicura, come gestire delle trap, insomma, come fare parecchie cose interessanti senza bisogno di installare un agente sulla macchina da tenere sotto controllo;

7.  GraphITe! Plottare Nagios. I dati di per sé sono nulla se non li aggreghi in qualche modo. Vedremo come generare dei grafici partendo dai dati recuperati da Nagios. Cosa useremo? Mah, io ho sempre utilizzato NagiosGrapher, ma anche Pnp4Nagios potrebbe andare bene;

8. Templare! Ok, non è una religione. Se i template base di NagiosGrapher non vi bastano, vedremo come crearne qualcuno a nostro piacimento, con tanto di legende, linee mediane e quant’altro.

9. Infighettiamoci. Beh, Nagvis fa sempre scena, vedremo come mettere Nagios sul palco e ben sotto i riflettori.

10. One step beyond! Ovvero della distribuzione. Qualcosa di più complicato? Per esempio Nagios in versione distribuita in modo da controllare ambienti molto complessi? Oppure Nagios in alta affidabilità?

Ok, mi sono giocato il prossimo anno di post.

Perché ho intitolato questo post “Brainstorming”? Perché se vi interessa, potete indicare nei commenti quali argomenti vorreste vedere trattati e quindi fornirmi qualche spunto nell’elaborazione dei prossimi post di questo corso.

Bon voyage…

Ah, giusto per dare un’idea…

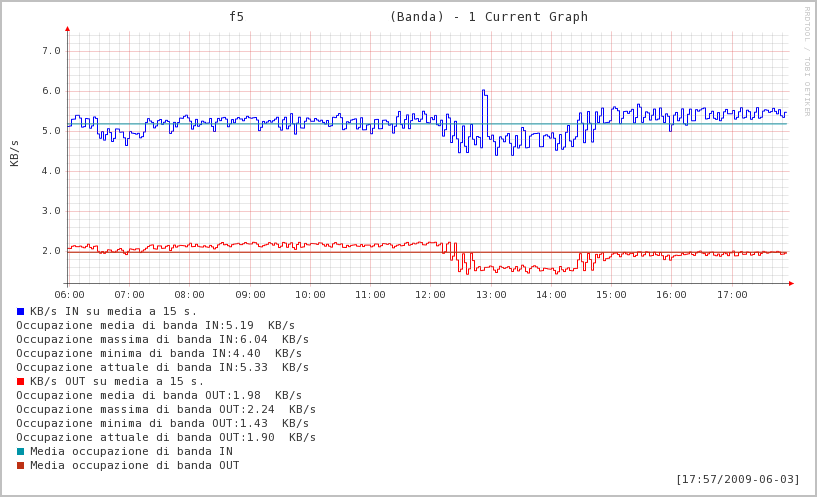
Misurazione di Banda tramite SNMP e grafico su NagiosGrapher

Rpm query arch

rpm -q pakage_name --queryformat "%{NAME}-%{VERSION}.%{RELEASE} (%{ARCH})\n"

Giusto perché non ricordo mai come far visualizzare a rpm una lista coerente di pacchetti con relative architetture.

Per esempio:

rpm -q glibc-devel-2.3.4-2.41 --queryformat "%{NAME}-%{VERSION}.%{RELEASE} (%{ARCH})\n"

glibc-devel-2.3.4.2.41 (x86_64)
glibc-devel-2.3.4.2.41 (i386)

Se, invece, si desidera la lista di tutti i pacchetti installati, con relative architetture:

rpm -qa --queryformat "%{NAME}-%{VERSION}.%{RELEASE}-(%{ARCH})\n"

History Time Format

Did you ever had a look at you bash history?

No? Well, try it issuing the following command:

root@moveaway: history
...
996  netstat -tapn
997  vi /etc/my.cnf
998  vi /etc/my.cnf
999  service mysql restart
1000  service mysqld restart
1001  history

Wow! One thousand (and one) commands issued on my laptop command line! Nice, insn’t it?

Well, ohhhh yess…but…mmm…when did I issue each command?

The default behaviour for the bash history file (.bash_history in your home directory), is to take note only of the commands, nothing else, as you can see “catting” the raw file:

root@moveaway: cat .bash_history
..
netstat -tapn
vi /etc/my.cnf
vi /etc/my.cnf
service mysql restart
service mysqld restart

Not that useful if you are trying to link some correlations from the commands you issued and what happened in your system. Better for you to timestamp you history log.

How to do it?

First, let’s pay attention to what

root@moveaway: man bash

tells us:

HISTTIMEFORMAT
If this variable is set and not null, its value is used as a format string for strftime(3) to print the time stamp associated with each his-
tory entry displayed by the history builtin. If this variable is set, time stamps are written to the history file so they may be preserved
across shell sessions.

So, setting the variable

HISTTIMEFORMAT

would give a relief to our concern. The syntax is similar the one you use for the command

date

so

man date

will help you to find a proper format string for this variable. Anyway, if you have no idea, here is a pre formatted variable (Year-Month-Day Hours:Minutes:Seconds)

HISTTIMEFORMAT="%Y-%m-%d %H:%M:%S "

This string alone won’t work, we have to “export” it as a environment variable:

export HISTTIMEFORMAT="%Y-%m-%d %H:%M:%S "

Mmm…let’s have a look to our history:

root@moveaway: history
997  2008-07-31 19:40:34 vi /etc/my.cnf
998  2008-07-31 19:40:34 vi /etc/my.cnf
999  2008-07-31 19:40:34 service mysql restart
1000  2008-07-31 19:40:34 service mysqld restart
1001  2008-07-31 19:40:37 history

Ouch! All the entries have the same date stamp! Well, to fix this we should exit the login session and logon again, but our environment variable would get lost. We must make it lasting through sessions. Let’s invoke the

man bash

command again:

When bash is invoked as an interactive login shell, or as a non-interactive shell with the –login option, it first reads and executes commands from
the file /etc/profile, if that file exists. After reading that file, it looks for ~/.bash_profile, ~/.bash_login, and ~/.profile, in that order,
and reads and executes commands from the first one that exists and is readable.

Interesting. It’s time to edit the

/etc/profile

file and write the command in, to make it last:

export HISTTIMEFORMAT="%Y-%m-%d %H:%M:%S "

Save the file, exit the login session and logon again. Now issue some commands…

root@moveaway: prova_time_stamp_1
-bash: prova_time_stamp_1: command not found
root@moveaway: prova_time_stamp_2
-bash: prova_time_stamp_2: command not found
root@moveaway: prova_time_stamp_3
-bash: prova_time_stamp_3: command not found
root@moveaway: history

Well, not real commands, but they will be a good placeholder to mark the timestamps. Let’s issue

history

again:

1001  2008-07-31 19:42:46 prova_time_stamp_1
1002  2008-07-31 19:42:54 prova_time_stamp_2
1003  2008-07-31 19:43:00 prova_time_stamp_3
1004  2008-07-31 19:43:25 history

It works! Now our history is marked with a time stamp for each entry, so it will be easier to understand when a command has been issued. Let’s have a look to the

.bash_history

file, but since the file is fully written only after the login session is closed, logoff, logon again and then issue:

root@moveaway: cat .bash_history
...
#1217533366
prova_time_stamp_1
#1217533374
prova_time_stamp_2
#1217533366
prova_time_stamp_3
#1217533405
history

What’s that? Each command is prefixed by a Unix Timestamp, which is converted for you by the

history

command, otherwise you can use an online converter.

Good, isn’t it?

2 Cent Tip:

If you want your history file to take note of more than the standard 500 commands, put in the

profile

the following string:

export HISTSIZE=1000

You will have a 1000 commands worth history file.

Second 2 Cent Tip:

If you want more infos on the time syntax for

HISTTIMEFORMAT

have a look to

man 3 strftime